Search This Blog

Showing posts with label Eggless Baking. Show all posts

Tuesday 19 June 2018

Eggless Strawberry Jam Muffins Recipe | How to Bake Strawberry Jam Muffins | Eggless Bakes

Eggless Strawberry Jam Muffins #Recipe
These eggless strawberry jam muffins are one of the easiest things to bake. If you like to enjoy the flavour of strawberries, even after the season is long gone, this is one way - use good quality strawberry jam for making these for best taste.

My life has been doldrums past few days. Both my maids are on extended leave and I am just managing to keep my sane doing all the household chores and managing my super active toddler. I am just so thankful that school are open now and that I have at least 2 hours in a day when I do not have to multi-task. One of the consequences of my maidless life is that my blog has suffered from lack of attention. This recipe for strawberry jam muffins which I had to post before 15th of this month is finally seeing the light of the day today.

This recipe is a part of the Recipe Swap Challenge where I was partnered with Priya who blogs at Priya's Versatile Recipes. Choosing one recipe from her blog is a challenge in itself - she perhaps has more than 1000 recipes posted on the blog. But, finally, I settled for these Blueberry Jam Muffins as I was in a mood to bake something and I had some strawberry jam that needed to be used. It is a simple fuss-free recipe that is almost failproof. Try it and I am sure, you will not be disappointed.

Tuesday 15 May 2018

Eggless Whole Wheat Almond Cookie Recipe | Eggless Baking | Cookies Recipe

Eggless Whole Wheat Almond Cookie Recipe
Eggless Whole Wheat Almond Cookie #Recipe
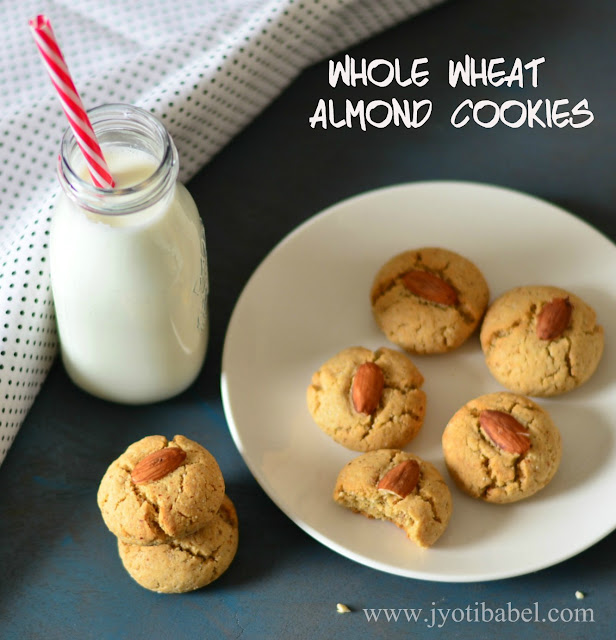
These eggless whole wheat almond cookies come with the goodness of almonds and whole wheat. So, shun the store bought refined flour cookies and enjoy these with a glass of milk.

Some time back, one of my fellow bloggers - Jolly, suggested that we try alphabet themed blog hop event and I was so excited about the whole idea. But, give it to my planning and execution, I am here with my blog post for the themed event on the very last day! Initially, I thought I would try something with apples. I had a couple of ideas - apple pie, apple crumble pie or applesauce brownies. But, none of those worked. And today, on the very final day for posting the recipe, this idea of almond cookies lit up in my head.

I just went into the kitchen, gathered all the ingredients and bingo - the cookies were done, photographed in good time.

Tuesday 16 January 2018

Eggless Double Chocolate Muffins | How to Bake Eggless Double Chocolate Muffins from Scratch

Eggless Double Chocolate Muffins | Made with wholewheat flour this is quite a healthy recipe and it tastes awesome | www.jyotibabel.com | how to make eggless double chocolate muffins from scratch

This recipe for eggless double chocolate muffins has been long due. It has been sitting in my drafts for some months now. Since I have been somewhat occupied with a new project, this food blog of mine is suffering from some lack of attention. Half of the first month of the new year 2018 has elapsed and nothing had been posted here till now. I decided that I need to do the needful today and this recipe from my drafts has come to my rescue.

This recipe is a simple one and it is a healthy one as there has been no use of refined flour. I have used regular sugar, but you can go ahead and use brown sugar to make it even healthier and guilt-free. They go well with a cup of coffee. So, if you are planning a meet up with friends over coffee, this is one recipe you can try.

Tuesday 22 April 2014

Funfetti Cake Recipe with Buttercream Icing | How to Bake Funfetti Cake | Eggless Baking

This funfetti cake is a simple eggless vanilla cake embellished with cute and colourful funfetti and made indulgent by a layer of buttercream icing.
Funfetti Cake with Buttercream Icing
#Recipe
This funfetti cake is a simple eggless vanilla cake embellished with cute and colourful funfetti. I have made it more indulgent by covering it up with buttercream icing. Given that the cake can be quite colourful, it is sure to be a hit with kids.

It has been quite a while since I updated this blog with a cake recipe. It is not that I am not baking these days, it is just that I am not experimenting too much; I am sticking to my tried and tested recipes most of the times.

The cake I am sharing today is a simple vanilla cake adorned with cute little colourful sprinkles. This one got a thumbs up from DH. So, it makes perfect sense to share it here. Initially, I didn't plan to blog about it. So, I didn't take proper pictures of the full cake. But, since it was a hit at home, I decided to blog about it. the slice in the picture was only left, so I made good use of it in clicking the picture.

Without much ado lets check out the recipe for my 'funfetti cake with buttercream icing'.


PIN IT FOR LATER
This funfetti cake is a simple eggless vanilla cake embellished with cute and colourful funfetti and made indulgent by a layer of buttercream icing.

If you ever try this recipe, do share your feedback and photos with me on my Facebook PageTwitter Handle or tag me on Instagram @jyotibabel using the hashtag #jyotispages 

Funfetti Cake with Butter-cream Icing Recipe

Ingredients:

1½ cups all-purpose flour/maida
1 cup thick hung yoghurt
1 cup powdered sugar
½ tsp baking soda
1¼ tsp baking powder
½ cup minus 2 tbsp oil
1 tsp vanilla extract
3-4 tbsp milk or water, add as needed
¼ cup multi-colour funfetti

Butter-cream Icing

1½ cup icing sugar
¼ cup + 3 tbsp butter
1-2 tbsp cream

With an electric beater, beat the butter until soft and fluffy. Add the sieved icing sugar little by little, beating all the time. Add cream and beat till the icing is well incorporated. Set aside in refrigerator till needed. 

Sugar syrup

3 tbsp powdered sugar
¼ cup water

Mix to form a thin sugar syrup

Process:

1. Preheat the oven to 180 C. Grease a 9'' round tin and dust it with flour.

2. Sieve flour and keep aside. Cream the powdered sugar and yoghurt until sugar completely dissolves.

3. Add baking powder, baking soda to the creamed mixture and mix well. Leave aside for 5 mins and till bubbles appear in the mixture and it slightly increases in volume

4. Now add in vanilla essence and oil and whisk. Slowly add the flour little at a time and blend with wet ingredients. Beat well till creamy and thick. Add water/ milk as needed to form a dropping consistency batter. Stir in the funfetti.

5. Pour the batter prepared tin and bake in the preheated oven for 10 minutes at 180 C. Then reduce the temperature to 160 C and bake it for another 30-35 mins. 

6.  The cake is done if a skewer inserted in the centre comes out clean. Allow the cake to cool down for 10 mins then, invert it onto a plate. When the cake has completely cooled down, it is ready to be iced.

Slit the cake in half horizontally and place one half on a cake stand. Brush half of the syrup generously. Spread a thin layer of the icing. Cover with the other half and brush with sugar syrup. Spread the rest of the icing over the cake. Decorate the top by sprinkling some more funfetti sprinkles.
This funfetti cake is a simple eggless vanilla cake embellished with cute and colourful funfetti and made indulgent by a layer of buttercream icing.
Slice, serve and enjoy!

Thank you for stopping by! Cheers!


If you are on social media, take a minute to follow me there to stay updated about my blog posts. 

Tuesday 27 August 2013

Nutella Swirl Cupcake Recipe | How to Bake Nutella Swirl Cupcake | Eggless Baking

Nutella Swirl Cupcake Recipe | How to Bake Nutella Swirl Cupcake
Nutella Swirl Cupcake #Recipe

Nutella Swirl Cupcakes comes with the deliciousness of Nutella. Just a dollop of Nutella into plain cupcakes takes it to a whole new level in terms of taste and look. Today's recipe - Nutella Swirl Cupcake is one of the results of my little sis' baking adventures. She loves baking and she does a really good job at it.

I can't believe it is almost going to be a month since I blogged last on this space. I have received emails and messages from friends and readers as to why this space has been void for such a long time.I don't know myself, but it looks like I am going through a severe case of blogger's block.

Even today one of my younger sister's experiments in the kitchen is rescuing this space from the long silence. This month, I have spent a good amount of time away from my kitchen and now I am enjoying a couple of days at my mom's place. I am so glad that my little sis' creation has come to my rescue just when I needed it.

Tuesday 1 January 2013

Custard Powder Bundt Cake ~ Egg less Yellow Cake With Chocolate Ganache


A very happy new year to all my fellow bloggers and my blog readers. May the new year bring you lots of happiness, prosperity and good health!

I have been away from this space for over a month now. Actually, I have shifted places and am now settling down slowly in a new city. There was a lot happening on the home front that blogging took a back seat. I will try to blog more frequently from now on. Today, I have something sweet to share from my drafts. I had made this cake quite some time back for our girls get together.

So lets start the new year on a sweet note!


 Recipe Source: Divine Taste 
 
Custard Powder Bundt Cake ~ Egg less Yellow Cake

Ingredients:
1 cup milk
1 cup granulated sugar
1 1/2 cups plain flour
1/2 cup vanilla custard powder
2 tsp baking powder
1/4 tsp baking soda
1 tsp vanilla extract
1/2 cup butter

Process:
1.      Grease a bundt tin or a 8” round tin and lightly dust it with plain flour. Tap to remove excess flour from the surface of the pan. Preheat the oven at 160 C.
2.      In a large bowl shift all the dry ingredients except sugar.
3.      In a separate bowl whisk butter and sugar till soft and fluffy. Add in room temperature milk and whisk till well incorporated.
4.      Add the dry ingredients to the wet ingredients and mix well with a whisk until there are no lumps.
5.      Pour the batter into the prepared tin and bake at 160 C for 45 minutes to 55 minutes, until a skewer comes out clean.

For the ganache:

50 ml cream
50 gm chocolate chunks

1. Add both the ingredients in a microwave safe bowl and heat for a minute. Stir till you get a smooth silk ganache.

Pour it over the cake once the cake is fully cooled. I had poured it while the cake was still a bit warm( was in a hurry). So, the ganache melted and dripped down ;(

Note: The cake taste best when eaten on the same day. Later it tends to get dry.

Thank you for stopping by! Cheers!

Saturday 15 September 2012

Egg less Red Velvet Cake

Past few days in India has been hectic. I had been hoping to be able to blog from here, but was caught up with so many different things that, in the end blogging took a back seat. Today, I decided to give my blog a visit and found there are a few drafts which could be posted with a little effort. Of course, I do not want you guys to forget me while I am away from this space.

While I know I am posting two decadent sweets one after another, I really cant help it. The cake I am sharing today is the one I baked for my DH's birthday last month. I was hoping I would be able to post it sooner, but couldn't. I decided to post it on my birthday which was a couple of days back but, couldn't.really manage to do even that. So, today to break my long absence from blogging, I want to virtually treat you all with this Red Velvet Cake!


Birthdays are special. So, I like to bake something special. This Egg less Red Velvet Cake is also a result of such efforts. The cake was not as red as I would have like and I later felt I could another table spoon of the red colour. But, after it was iced and cut, the red looked reasonably good in contrast with the white icing. I actually forget to take a picture of a slice, so pardon me for that.

This article on wiki gives a synopsis of the history of this special cake. Since this cake is egg less I have deviated a lot from the way that cake is traditionally make. But for an egg less cake, the results were pretty good. Lets see how I made it.


Ingredients:

11/2 cup + 2tbsp plain flour +1tbsp cocoa powder
2 tsp baking powder
1 tsp baking soda
1tin condensed milk
1/2 cup butter, at room temperature
1/2 cup yogurt + 1/2 cup water
2 tbsp red colour (add another tbsp for a brighter red colour)
1tsp vanilla extract
1tsp apple cider vinegar

Process:

1. Preheat the oven at 160 C. Line a 9" round tin. Please note that baking time may vary if you choose a smaller or larger tin. So, adjust accordingly.

2. Shift the flour, baking powder and baking soda twice. Set aside.

3. In a large bowl whip the condensed milk and butter till the mixture is creamy. Add the red food colour and whisk again.

4. Add the flour mixture to the creamed mixture in 2-3 parts. Keep stirring while adding flour mixture. Add butter milk, vinegar and whisk for another 2 minutes. The batter will have a pouring consistency. Don't over do it

5. Pour the batter in the prepared tin and bake it in the preheated oven for 30 minutes at 160 C. Then lower the temperature to 150 C and bake for another 15-20 minutes.

6. The cake is done when a skewer inserted in the middle comes out clean. Cool for at least 15 minutes before turning the cake out of the tin.Cool completely before icing the cake.

Mascarpone Cream Icing:

280 gm mascarpone cream
225 gm whipping cream
3/4 cup icing sugar

Pour all the ingredients in a large bowl and whip it till it is creamy and has a soft peak consistency. Chill it in the fridge for half an hour.

Assembling the cake:

Slice the cake in 3 layers. In a cake plate place the top most layer and spread the prepared icing in an even layer. Top it with the second and third layer in the same way and cover the whole cake with rest of the icing. Get creative with decorating the cake. I used piped border, glace cherries and chocolate hearts. You can do it the way you fancy!


I will definitely try to blog more often. I have read a few books and I will post the reviews soon. Stay tuned.
Thank you for stopping by! Cheers!

Wednesday 30 May 2012

Double Chocolate Banana Muffins


double chocolate banana muffins

A simple and easy double chocolate banana muffins recipe made with whole wheat flour. Perfect with a cup of coffee. Have a ripe banana lying around, you should definitely try this recipe.

For Egg less Bakes this month Gayathri chose this Banana Muffin recipe. The recipe had eggs and all bakers had to try out the eggless version. As I have already tried a variation of banana muffin, I decided to play with the flavours. So, I added some cocoa powder and some choco chips and for a healthier option used whole wheat flour and oil. The muffins came out very moist and the flavour of banana was not very overpowering.

Double Chocolate Banana Muffins:

Ingredients:

3/4 cup whole wheat flour
2 tbsp cocoa powder
1/2 tsp baking powder
1/2 tsp baking soda
1/4 tsp salt
1 large banana mashed
3/8 cup sugar
4 tbsp oil
1tsp lemon juice
4 tbsp choco chips
3 tbsp yoghurt
3 tbsp water

Process:

1. Sieve all the dry ingredients and set aside. Coat the choco chips with 2 tbsp of the flour mixture.

2. Preheat the oven to 175 C. Line a six-hole muffin pan with muffin liners.

3. Make a hole in the centre of the flour mixture and add the mashed banana, oil, yoghurt and water and mix with a whisk. Add lemon juice and choco chips and stir with a spatula. The batter should not runny but of whipped cream consistency.

4. Bake at 180 C for 15-18 minutes. When done, a skewer inserted in the middle comes out clean.

5. Enjoy with a cup of tea or coffee.

double chocolate banana muffins

Thanks for stopping by! Cheers!

Wednesday 9 May 2012

One Bowl Eggless Brownies

I had baked these brownies during the last weekend. It was a long weekend and hence a time for good food. I had been on a very plain diet for a long time due to my illness and now when I am feeling 100% fine, I wanted to indulge in my favorite thing - 'Chocolate'. What else is better than a brownie if you want something chocolate-y! Right, but I was not really in a mood to wash a sink full of utensils. That's when one bowl egg less brownies were born.

Long weekend also means some short trips, provided the weather is good. God must have heard my cribbing about the persistent bad weather and hence blessed us with a gorgeous sunny Saturday. We went for a day trip to Bray, a small seaside town in county Wicklow. Details about the trip will need another post but, I can't help sharing a picture of the day here.


Isn't it gorgeous?

Coming back to the brownie recipe, you will need:


One Bowl Eggless Brownies

Ingredients:
1 1/4 cup AP Flour
1/4 cup cocoa powder
3/4 tsp baking powder
3/4 cup sugar, powdered
1/4 cup sunflower oil
3/4 cup low fat yogurt
1 tsp vanilla essence
1/4 to 1/2 cup milk
3- 4 tbsp chopped nuts( Optional, I used hazelnuts)

Process:
1. In a large bowl shift the AP Flour, cocoa powder, baking powder and sugar in a large bowl. Whisk them till they are evenly mixed.
2. Preheat the oven at 180 C and grease and dust a 9x9 inch square pan.
3. Make a hole in the center of the flour mixture and add in the oil, yogurt, vanilla and half of the milk. Using a whisk or a spatula mix to form a spreadable batter. Add more milk if needed.
4. Pour the batter into the tin and spread it evenly. Bake it at 180 C for 35-40 mins. Cool it for 10 minutes before slicing.

Enjoy them warm with a scoop of vanilla ice cream and a drizzle of chocolate sauce.


Linking it to ShowCase - Dessert


Thank you for stopping by! Cheers!

Friday 27 April 2012

Egg less Vanilla Cake (With Condensed Milk and Coke)

It has been a while since I shared a cake recipe here. I do bake often but not all get posted here. I had clicked these pictures quite a while back. Only now it is making its way to this space. When ever I have a cake craving, it is usually for chocolate cake or a brownie. But, DH loves plain vanilla cake. So, when ever he requests me for a cake, it is plain vanilla only. Anything else should come with an icing.

I make the plain vanilla cake in a couple of ways, sometimes with yogurt, sometimes with vinegar. But, my favorite way is with condensed milk. So, if I have condensed milk can at home, I go this way.
There are many recipes floating around the web for a cake with condensed milk. Even, I remember my mom making  cakes with condensed milk. I can say it is the most traditional way of making egg less cakes. For the liquid content of the cake, I like to use coke or soda water. It really makes a difference to the texture of the cake. However, it can be replaced by milk or water if you don't have aerated cold drink at hand.

Eggless Vanilla Cake (With condensed milk and coke)

11/2 cup AP Flour
2 tsp baking powder
1 tsp baking soda
1/2 cup soft butter
1 tin sweetened condensed milk (400gm)
2/3 cup coca cola at room temperature.
2 tsp vanilla extract

Butter and flour for greasing and dusting the pan


Process:

1. Preheat the oven at 180 C. Line a 9" square tin. Please note that baking time may vary if you choose a smaller or larger tin. So, adjust accordingly.

2. Shift the flour, baking powder and baking soda twice. Set aside.

3. In a large bowl whip the condensed milk and butter till the mixture is creamy.

4. Add the flour mixture to the creamed mixture in 2-3 parts. Keep stirring while adding flour mixture. Add the coke in the end and whisk for another 2 minutes. The batter will have a pouring consistency.

5. Pour the batter in the prepared tin and bake it in the preheated oven for 15 minutes at 180 C. Then lower the temperature to 160 C and bake for another 25- 30 minutes.

6. The cake is done when a skewer inserted in the middle comes out clean. Cool for at least 15 minutes before turning the cake out of the tin. Slice and enjoy!


Notes:
1. Add the aerated drink at the end only and be fast in pouring it into the greased pan and get baking.
2. Aerated drink can be replaced by room temperature milk or water. But, I find aerated drink gives a lighter texture to the cake.
3. If you are using a smaller pan, it make take longer to bake it. Similarly, if using a larger pan, it will get baked quicker. So, adjust accordingly and keep an eye.

Linking it to Bake Fest #6. This event is the brain child of Vardhini.

Thank you for stopping by. Cheers!

Tuesday 3 April 2012

Chocolate Cornets

For Egg less Bakes this month Gayathri chose this Chocolate Cornet recipe. The recipe had eggs and all bakers had to try out the egg less version. The cornet is made of bread dough and is filled with chocolate custard. For the dough, I substituted eggs with a mixture of yogurt and milk and for the chocolate custard I used corn flour.

These Chocolate Cornets will be great for kids. I filled four of them with chocolate custard and rest with a savoury samosa filling. However, I am giving the measurement of custard need for 12 cornets here. Baking them was fun. though it seemed a lengthy process as I had to make the cornet's molds from scratch.


Recipe Source:  CookingWith Dog

Ingredients:
Makes 12 Cornets:

For the dough:
300gm flour +1/4 cup flour for dusting
1 tbsp milk powder
2tbsp sugar
1 tsp salt
7 gm Instant Yeast
140ml warm Water
2 tbsp yogurt
2 tbsp milk
30 gm butter

For The Chocolate Custard:
350 ml silk
¼ cup sugar
2 tbsp corn starch
3/8 cup chopped chocolate (I used a combination of dark and milk chocolate)
1 tsp vanilla extract

For The Cornet molds:
Please refer tothis video to check how to make them


For The Bread Cone:
Process:

1.  In a bowl, mix flour, salt, and milk powder. In lukewarm water add the sugar and then sprinkle yeast over it and let it sit for 5 minutes to rise.
2. Make a whole in the flour mixture and add the yeast mixture to the flour mixture. Add yogurt and milk and prepare soft dough.
3. Knead the dough for 5 minutes and then flatten it on the counter dusted with flour. Place the chopped pieces of butter in the middle and cover it with the dough.
4. The dough will be very sticky at this point, use extra flour and knead it for another 5-7minutes until the butter is well incorporated and the dough becomes soft and elastic.
5. Place the dough in a large greased bowl and cover with a plastic wrap.
6. Keep it in a warm place to rise till it is double in volume.
7. When well risen, punch the air out of it and divide it into 12 equal portions.
8. Roll each portion into a ball and keep it covered on the counter for 15 minutes.
9. Grease the cornet molds with butter
10. Flatter each ball and shape them into a long rope such that it is thin at edges and thicker in the middle.
11. Wrap it around the cornet molds. Start from the bottom to the top of the mold and then pinch the end of the rope to close it.
12. Place the prepared cornets on a greased tray and allow it to rise for 15-20minutess.

13. Preheat oven to 200C and bake the cornets for 10-12 minutes. When done place them on a wire rack to cool. Unmold the cornet and store cornets in an airtight box until needed.

Chocolate Custard: 
I prepared the custard in microwave.

Process:

  1. Place the chopped chocolate in a microwave safe bowl and heat it in the microwave till it is melted. It will take 2 minutes.
  2. Mix the corn starch, sugar in a large microwave safe bowl and add in the milk. Whisk to remove any lump. Microwave it for 2 minutes. Whisk again. Add the melted chocolate and vanilla essence. Whisk. Microwave it again for 3-5 minutes whisking after every 1 minute.
  3. The custard is done the mixture comes thick and creamy. Time may vary from microwave to microwave. So, keep an eye on the process.

Assembling the Chocolate Cornets:

1. Fill the custard in a zip lock bag and make a small hole at one of the edges.
2. Place the tip inside the cornet and squeeze the bag to fill the cornet with the custard.
3. Repeat the same with other cornets. Serve with tea or coffee. Enjoy!

Linking it to Yeast Spotting

Friday 2 March 2012

Eggless Coconut Cake


Egg less Bakes is a group started by Gayathri and for the first edition she chose a egg based coconut cake recipe. All the participants had to try out an egg less version and post it on their blog on a specified date. To know more about it and participate, check this.

I have made a lot of changes to the original recipe. I have halved the recipe and have substituted half of the flour with whole wheat flour, butter with oil and have used a combination of yogurt, baking soda and coconut milk to substitute the eggs. Lets hop to the recipe to see how I have made it.

Ingredients:

1/2 cup AP Flour
1/2 cup whole wheat flour
1 tsp baking powder
1/2 tsp baking soda
1/2 cup + 2 tbsp caster sugar
1/2 dessicated coconut
1/4 cup yogurt
1/4 cup oil
1/2 cup coconut milk
1 tsp vanilla essence


Process:

1. Preheat the oven at 175 C and grease and dust a 7" square pan.
2. In a large bowl sieve the flours, baking powder, baking soda.
3. Add sugar and dessicated coconut and whisk such that the mixture is uniform.
4. Make a hole at the centre of the mixture and add all the wet ingredients one by one and whisk till the batter is well incorporated. Do not over beat. The batter consistency is on the thicker side, yet of pouring consistency.
5. Bake it at 175 C for 35- 40 minutes till a tooth pick inserted comes out clean.
6. When baked, let it sit over 15 minutes and then invert it on a wire rack. When it cools completely slice and serve.

The cake had a slight crust, but was soft inside. The coconut flavour was good although freshly grated coconut will give a more prominent flavour. All in all I am satisfied with the results as far as texture is concerned. But the cake was a little less sweet and the coconut flavour was not as prominent as I would have liked. So next time I make it I would like to use 1 cup of freshly grated coconut and increase the sugar to 3/4 cup.

Thanks for stopping by. Cheers!

Sunday 25 December 2011

Heartiest Christmas Wishes with Chocolate and Dates Cake (Eggless)

At the very outset my heartiest wishes to all who celebrates Christmas. Wish you a very merry and fun filled Christmas!
Whether you celebrate this festival or not, you can't miss the festivity in the air and of course good food is all a part of the festive spirit. As everybody, I can't miss the opportunity to indulge in something delicious and of course baking comes to my mind.


I made this cake for a small get together at a friend's place. I was received well by my friends and in fact my DH also gave a thumbs up to it even though he is not a very big dates fan. The taste of dates is very subtle and in this particular cake it helps to accentuate the chocolate flavour. This recipe actually comes from one of my friends. I have only experimented a little by adding cocoa to it. 
 
Without much ado let's hop to the recipe:

Ingredients:

1 cup minus 2 tbsp AP Flour
2 tbsp cocoa powder
1/2 cup castor sugar
1/2 cup pitted dates(About 15-18 soaked in water for 2-3 hours or overnight).
1 tsp baking powder.
3/4 tsp baking soda.
1/4 cup melted butter.
1/4 cup water used for soaking dates.
1/2 cup milk.
Process:

1. Grease a 6'' square cake tin and preheat the oven at 180C.
2. Churn the dates along the water and milk to make a smooth paste.
3. Shift flour, baking powder, soda 2-3 times together so that it is well blended.
4. Cream in the sugar and butter till well incorporated and fluffy.
5. Slowly add the dry ingredients to the wet ingredients whisking all the time.
6. Whisk till the batter is smooth, around 2-3 minutes.
7. Pour into the pre greased tin and bake at 180 C for 20 mins and then lower the temperature to 160 C and bake for another 15-20 minutes or until a skewer inserted in the middle comes out clean.
8. Let it rest in the tin for 5-10 mins before turning it on a wire rack to cool.
9. Cool completely and slice. Serve.

Thank you for stopping by! Merry Christmas! Cheers!