Search This Blog

Tuesday 3 April 2012

Chocolate Cornets

For Egg less Bakes this month Gayathri chose this Chocolate Cornet recipe. The recipe had eggs and all bakers had to try out the egg less version. The cornet is made of bread dough and is filled with chocolate custard. For the dough, I substituted eggs with a mixture of yogurt and milk and for the chocolate custard I used corn flour.

These Chocolate Cornets will be great for kids. I filled four of them with chocolate custard and rest with a savoury samosa filling. However, I am giving the measurement of custard need for 12 cornets here. Baking them was fun. though it seemed a lengthy process as I had to make the cornet's molds from scratch.


Recipe Source:  CookingWith Dog

Ingredients:
Makes 12 Cornets:

For the dough:
300gm flour +1/4 cup flour for dusting
1 tbsp milk powder
2tbsp sugar
1 tsp salt
7 gm Instant Yeast
140ml warm Water
2 tbsp yogurt
2 tbsp milk
30 gm butter

For The Chocolate Custard:
350 ml silk
¼ cup sugar
2 tbsp corn starch
3/8 cup chopped chocolate (I used a combination of dark and milk chocolate)
1 tsp vanilla extract

For The Cornet molds:
Please refer tothis video to check how to make them


For The Bread Cone:
Process:

1.  In a bowl, mix flour, salt, and milk powder. In lukewarm water add the sugar and then sprinkle yeast over it and let it sit for 5 minutes to rise.
2. Make a whole in the flour mixture and add the yeast mixture to the flour mixture. Add yogurt and milk and prepare soft dough.
3. Knead the dough for 5 minutes and then flatten it on the counter dusted with flour. Place the chopped pieces of butter in the middle and cover it with the dough.
4. The dough will be very sticky at this point, use extra flour and knead it for another 5-7minutes until the butter is well incorporated and the dough becomes soft and elastic.
5. Place the dough in a large greased bowl and cover with a plastic wrap.
6. Keep it in a warm place to rise till it is double in volume.
7. When well risen, punch the air out of it and divide it into 12 equal portions.
8. Roll each portion into a ball and keep it covered on the counter for 15 minutes.
9. Grease the cornet molds with butter
10. Flatter each ball and shape them into a long rope such that it is thin at edges and thicker in the middle.
11. Wrap it around the cornet molds. Start from the bottom to the top of the mold and then pinch the end of the rope to close it.
12. Place the prepared cornets on a greased tray and allow it to rise for 15-20minutess.

13. Preheat oven to 200C and bake the cornets for 10-12 minutes. When done place them on a wire rack to cool. Unmold the cornet and store cornets in an airtight box until needed.

Chocolate Custard: 
I prepared the custard in microwave.

Process:

  1. Place the chopped chocolate in a microwave safe bowl and heat it in the microwave till it is melted. It will take 2 minutes.
  2. Mix the corn starch, sugar in a large microwave safe bowl and add in the milk. Whisk to remove any lump. Microwave it for 2 minutes. Whisk again. Add the melted chocolate and vanilla essence. Whisk. Microwave it again for 3-5 minutes whisking after every 1 minute.
  3. The custard is done the mixture comes thick and creamy. Time may vary from microwave to microwave. So, keep an eye on the process.

Assembling the Chocolate Cornets:

1. Fill the custard in a zip lock bag and make a small hole at one of the edges.
2. Place the tip inside the cornet and squeeze the bag to fill the cornet with the custard.
3. Repeat the same with other cornets. Serve with tea or coffee. Enjoy!

Linking it to Yeast Spotting

Friday 30 March 2012

Onion Bhajji Recipe | Onion Fritters Recipe | How to Make Onion Bhajji | Indian Street Food Recipes

Onion Bhajjis are Indian savoury onion fritters made primarily with onion slices and chickpea flour. Check out my recipe for onion bhajji here.
Onion Bhajji/ Onion Fritters #Recipe
Onion Bhajjis are Indian savoury onion fritters; they a crowd pleaser. It is one of the popular street foods in India. I love to have them hot with a cup of tea.

I had made them to take it to my work place and every body enjoyed it a lot. Few of them even remarked that they were really moist and flavourful unlike the ones you get in shops, which tend to be very dry when cold. The secret to it is adding a pinch of baking soda to the batter, it gives the inside of the bhajji a soft texture. I also add a couple of spoons of rice flour in the batter which gives a crispy crunch outside.

Without much ado, let's check out the Onion Bhajji recipe

Onion Bhajjis are Indian savoury onion fritters made primarily with onion slices and chickpea flour. Check out my recipe for onion bhajji here.


Onion Bhajji Recipe

Ingredients:

1 cup chickpea flour, shifted.
1 cup sliced onions (About 2 medium onions)
3 tbsp rice flour
1 green chili, de seeded and chopped
11/4 tsp salt
1 tsp red chilli powder
1/2 tsp roasted cumin powder
1/4 tsp turmeric powder
A handful of chopped coriander leaves
1 tsp ajwain/carom seeds
2 tsp crushed kasoori methi (dried fenugreek leaves)
2 tsp oil
1/4 tsp baking soda.

Process:

1. Peel the onion and cut it into four halves. Slice them thinly. Put the sliced onions in a large bowl and toss with the salt. Set aside for 10 minutes.
2. Add the chickpea flour, rice flour, chile powder, cumin, turmeric, ajwain, coriander leaves, baking soda,kasoori methi, green chilli and stir well. Add a couple of tablespoon of water to form a thick batter. Do not add water add water all at once, add spoon by spoon and stir with a spatula to check the consistency.
3. Heat 500 ml oil in a frying pan. When bubbles appear at the bottom of the pan lower it to medium. Drop tablespoon of batter into the hot oil. Fry 5-6 bhaajis at a time. If the pan is too crowded they will not cook evenly. Fry them till they are golden in colour. Stir it occasionally so that they are fried evenly.
4. Remove them with a slotted spoon and drain them on paper towel. Serve hot with coriander chutney or tamarind chutney. It can also be served with ketchup, pairs best with a cup of hot tea or coffee.

Notes:

1. Shifting chickpea flour helps in avoiding lump.
2. Make sure baking soda also has no lumps. Once the batter is made, don't let it sit for too long. Start preparing the bhajis in 5-7 minutes.
3. It is best to drop the batter in the oil using your finger. It can be a bit messy but helps in getting uniform shapes which in turn helps in uniform frying.
4. You can make them in advance and heat them in the microwave before serving.

Onion Bhajjis are Indian savoury onion fritters made primarily with onion slices and chickpea flour. Check out my recipe for onion bhajji here.

Have a nice weekend. Thank you for stopping by! Cheers!


Thursday 29 March 2012

Nimki/ Namakpaare Recipe | Papdi Recipe | How to Make Nimki and Papdi using the same dough


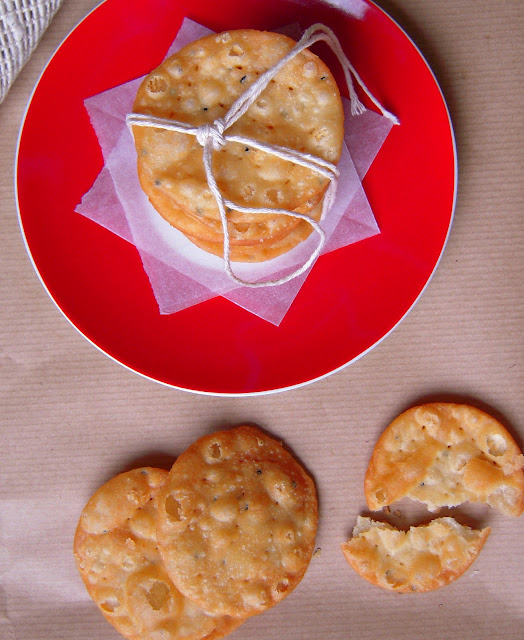
Nimki or Namak Paare are diamond shaped savoury fried crackers.  Using the same dough that is used to make nimki, I also make papdi. Find the recipe for nimki and papdi here.
Nimki/ Namakpaare Recipe | Papdi Recipe
Nimki or Namak Paare are diamond shaped savoury fried crackers. They go very well with tea. Using the same dough that is used to make nimki, I also make papdi, the round crackers that are quite used in Indian Chaats. In this post, I am showing you how to make nimki as well as papdi.

I have lots of memories attached to these Nimki. My mom makes the best Nimki in our home. I remember her making them in big batches during the festive season and we, kids used to poke around the kitchen to grab a few to munch on.

Even though I make them now myself, I still have not got the shapes perfect. Not that it matters when it comes to taste, but evenly shaped nimki looks way better.

Nimki or Namak Paare are diamond shaped savoury fried crackers.  Using the same dough that is used to make nimki, I also make papdi. Find the recipe for nimki and papdi here.

Papdis are essentially same as nimki, they just differ in shape. I use the same dough to make both of these. The best papdi are those which are crunchy and yet breaks easily. Nimki are more crunchy, their shape helps in their texture. Papdis are the most essential elements of the most popular Indian snacks like Papdi Chaat and Sev Puri. Today, I am sharing how I make 'Nimki' and 'Papdi' with the same dough.

Nimki or Namak Paare are diamond shaped savoury fried crackers.  Using the same dough that is used to make nimki, I also make papdi. Find the recipe for nimki and papdi here.

This recipe makes about 50 Papdis.

How to Make Nimki/Papdi/Namakpaare

Ingredients:

1 cup maida or all purpose flour
1/4 cup semolina
2 tablespoons oil
½ teaspoon salt
½ tsp black onion seeds.
Water to form a firm dough

Oil for brushing the dough and for frying

Process:

1. Mix maida or all purpose flour, semolina, salt and black onion seeds. Add the oil and use lukewarm water to make a firm dough. Keep it aside for 15-20 minutes before working on it.

2. Divide the dough in about 50 equal parts and roll them individually into 2 1/2 inch even rounds. Prick with a fork in about 4 to 5 place.

3. Heat the oil in a frying pan over medium heat. The frying pan should have at least 1 1/2 inch of oil. Fry the papdi on medium to medium-high heat until both sides are light golden-brown in colour.

4. Transfer them to a paper towel so that excess oil is soaked out. Let it cool completely before storing. They can be stored in airtight container for 1 month.

Nimki or Namak Paare are diamond shaped savoury fried crackers.  Using the same dough that is used to make nimki, I also make papdi. Find the recipe for nimki and papdi here.

Nimki is same as papdi but different in shape. To make them make the dough as made for papdi and follow the instructions below.

1. Divide the dough into five equal parts and shape them into smooth balls.

2. Roll one dough ball at a time into thin chapati like discs. Using a knife or a pizza cutter cut thin strips of the dough and cut the strips diagonally to get diamond shaped pieces.

3. Fry them in medium hot oil till they are golden brown in colour. Do the same with rest of the dough balls. Keep the rest covered when you are rolling one.

4. Cool them completely before storing.

Here is a link to video of making nimki to help you understand the process of making them, even though the recipes are not same.

Nimki or Namak Paare are diamond shaped savoury fried crackers.  Using the same dough that is used to make nimki, I also make papdi. Find the recipe for nimki and papdi here.

They are great to munch with afternoon tea.

Nimki or Namak Paare are diamond shaped savoury fried crackers.  Using the same dough that is used to make nimki, I also make papdi. Find the recipe for nimki and papdi here.

Thank you for stopping by! Cheers!

Saturday 24 March 2012

Random Pictures # 2 ~ Dublin ~ For Saturday Snapshot

                                                        Quays Bar and Restaurant, Temple Bar, Dublin

I wanted to do this post last week for Saturday Snapshot as St. Patrick's day was an ideal day to post some more pictures from this country. How ever, the idea didn't materialize. So, here I am this week with some random pictures from Dublin, Ireland for Saturday Snapshot. 

Saturday Snapshot is hosted by Alyce of At Home With Books. It’s easy to participate – just post a picture that was taken by you, a friend, or a family member and add your link on Alyce’s site.

 Temple Bar, Dublin

 Half Penny Bridge over river Liffey, Dublin

Bulter's Chocolate Cafe at Grafton Street, Dublin.

Thank you for stopping by! Cheers!