Search This Blog

Saturday 5 August 2017

Fattoush Salad | How to Make Fattoush Salad | Lebanese Recipes | Salad Recipes


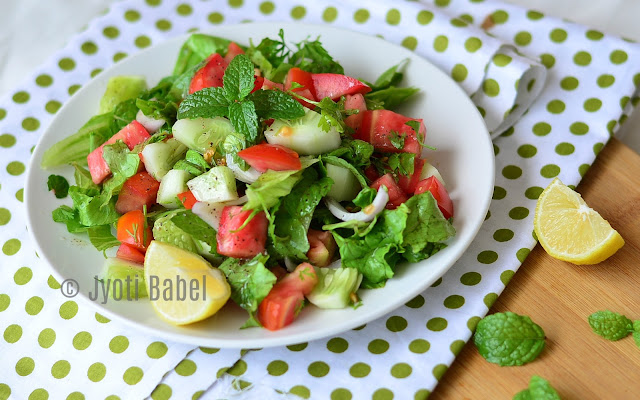
Fattoush Salad Recipe | Fattoush Salad is a Lebanese bread salad - greens, veggies and toasted pita bread pieces are the main ingredients. www.jyotibabel.com
Fattoush Salad #Recipe

Fattoush Salad is a Lebanese bread salad - greens, veggies and toasted pita bread pieces are the main ingredients. But, I have never loved bread croutons in my salad and for that reason, I have skipped the toasted pita chips in the fattoush salad I made.

The dressing for fattoush salad has two vital ingredients among others - sumac and pomegranate molasses. Sumac is tangy dried powder made from a kind of Middle Eastern red berry. Pomegranate molasses as the name says is made from pomegranate and is a commonly used ingredient in Middle Eastern cooking. I didn't have both these ingredients at hand, so I made the dressing without them. I have read that these two ingredients can make a lot of difference to the salad and I will surely try them whenever I get to buy them.

I did search about making pomegranate molasses at home and there were many links that said you could make it by cooking pomegranate juice over a low heat for a long time. But, then I am really wary of cooking fruit juices. So, I dropped the idea and went ahead to make my customised Fattoush Salad.

Last month had been an indulgent one for me foodwise. If you have checked my last month's posts, you will notice I posted mostly sweet dishes - brownieskheerpeda. All that was part of the themes I chose to do for that month's blogging marathon.

But, the result is now seen when I stand on the bathroom scale!

Such is the life of a food blogger - I want to cook all the delicious dishes in the world, but then I have to take some steps back as ultimately I will be on the receiving end.

So, for this month, I decided I would blog about something really healthy. My chosen theme for the first week of BM#79 is Lebanese cuisine. And today I am posting the recipe for Fattoush Salad, albeit a customised one.

Let's check out how I made my Fattoush Salad.


Fattoush Salad Recipe

Inspired from here

Ingredients:

4-5 Romaine Lettuce leaves washed and chopped
1 large tomato, chopped in chunks
1 small cucumber, chopped in chunks
1 small onion, sliced
a handful of mint leaves
a handful of coriander leaves, chopped
1 cup chopped pita bread pieces toasted ( I didn't use)

Dressing:
2 tbsp extra virgin olive oil
3-4 tbsp lemon juice
1 clove of garlic finely chopped
salt and pepper to taste
1/4 tsp sumac ( I didn't use)
2 tsp pomegranate molasses ( I didn't use)

Process:

1. Mix all the ingredients for the salad dressing in a bowl and whisk nicely.
2. Mix all the salad ingredients except toasted pita bread pieces.
3. Right before serving, add the dressing to the salad. Top it with pita chips (if you like) and serve immediately.

BMLogo

Friday 28 July 2017

Oats Mathri Recipe | How to Make Oats Mathri | Festive Recipes

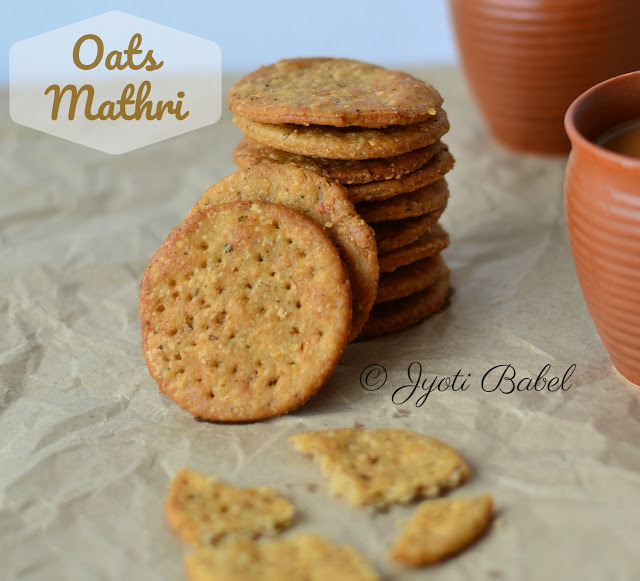
Oats Mathri | Mathri is an ever popular deep fried snack that goes well with Indian masala chai. In this version, I have prepared them it with oats flour. www.jyotibabel.com
Oats Mathri #Recipe

These Oats Mathri are a close cousin of the regular mathri. Mathri is an ever popular deep fried snack that goes well with Indian masala chai. While it is generally prepared with maida/all purpose flour, I decided to make a somewhat healthier version by using oats flour and wheat flour.

After posting sweet dish recipes one after the other here it's time I share something savoury. So, for the 3rd day of my special day/festival theme in blogging marathon, I am sharing a recipe for these oats mathri. Along with sweets, savoury snacks also have their rightful space in the menu during festivals – be it Diwali or Holi you cannot do without munching on a handful of them.


Looking for some more savoury snack ideas check out these:

Namak Pare
Rice Krispie Chiwda/Puffed Rice Chiwda
Masala Peanuts

Using different types of flour in cooking is quite in trend these days. So, I decided to make these mathris with oats flour and whole wheat flour. Without much ado, let’s check how I made them

Oats Mathri | Mathri is an ever popular deep fried snack that goes well with Indian masala chai. In this version, I have prepared them it with oats flour. www.jyotibabel.com
Oats Mathri Recipe

Ingredients

2 cup oats flour
1 cup whole wheat flour
1 tsp salt
1 tbsp ajwain
1/2 tsp crushed black pepper
3 tbsp oil
1 tbsp crushed kasuri methi
About ¼ cup to ½ cup water for the dough
Oil for deep frying

Process:

  1. In a mixing bowl add all the ingredients and using water little by little knead a firm dough. Cover and set aside for 15 minutes.
  2. Divide the dough into 4 balls. Roll each dough balls 1/8 inch thick and using a cookie cutter cut out circles of the dough. Poke a couple of holes in them and transfer the circles to a clean plate. Repeat the process with the rest of the dough.
  3. Heat oil in a pan for deep-frying. When the oil is hot enough deep fry mathri in batches in hot oil turning them in between. They are done when they are light brown in colour on both sides.
  4. Transfer them on a kitchen towel so that excess oil is soaked out. Once they are cooled store in airtight container.
  5. Enjoy with a cup of hot masala chai.

Notes:

1.       I churned rolled oats to get oats flour.
2.       Poking holes in the rolled circles ensure that mathri will not puff up like a puri when deep fried.
3.       Keeps well for 2 weeks when stored properly in an airtight container.
4.       The dough should be firm. A soft dough will not yield crisp mathri.
Thank you for stopping by! Cheers!


If you are on social media, take a minute to follow me there for all sorts of recipe updates.


BMLogo

Thursday 27 July 2017

Instant Peda Recipe | Peda Recipe with Milk Powder and Condensed Milk

Instant Peda Recipe | Peda is rich milk fudge make from khoya and flavoured with cardamom or saffron. In this instant peda recipe, we will make it with milk powder and condensed milk. www.jyotibabel.com
Instant Peda #Recipe

 Peda Recipe with Milk Powder and Condensed Milk

Peda is rich milk fudge flavoured with cardamom or saffron. It is also one of the favourite sweets of Lord Ganesha. So, it sells like hotcakes during Ganesh Chaturthi.

For the 2nd day of Week 4 of Blogging Marathon under the theme ‘Special Day/Festival’, I am posting the recipe for this much loved Indian sweet – Peda.

Traditionally Peda is made with khoya and sugar. Making khoya from milk is a painstaking process where you have to heat milk on low flame for a prolonged time so that all the liquid from the milk evaporates, leaving behind a dense and rich khoya. My mom makes peda from scratch and it is really a long process. You have to be really patient to make it that way.

The recipe I am sharing today is quite instant – by using milk powder and condensed milk you can prepare delicious peda in just 15 minutes. I browsed a lot of YouTube Videos before finally trying it out.

The first time I tried it, I heated the mixture little longer than necessary, so they came out little hard – but they tasted good nonetheless. So, I tried it again and this time they came out semi-soft but not soft like malai peda. But, they were good enough.

Instant Peda Recipe | Peda is rich milk fudge make from khoya and flavoured with cardamom or saffron. In this instant peda recipe, we will make it with milk powder and condensed milk. www.jyotibabel.com

Instant Peda Recipe

Ingredients:

200 g milk powder
200 g condensed milk
3 tbsp ghee
4 cardamom pods, crushed and finely powdered

Process:

1.       In a non-stick pan on medium flame add ghee. To it add the milk powder and condensed milk and using a spatula stir well such that the mixture is uniform and well mixed.
2.       Keep heating the mixture on medium heat for about 10-12 minutes and using the spatula keep tossing and turning the mixture as it cooks.
3.       Add the cardamom powder and mix well. Take it off heat. At this point, the mixture should resemble smooth soft dough.
4.       Take the dough out into a clean bowl and let it cool down a little.
5.       When the dough has cooled enough to handle (but not completely cold), grease your palm with little ghee and form small bite-size balls.
6.       I used terra cotta moulds to get the design impression on the peda. If you have such moulds, you can do the same. Else you can just flatten the balls a bit and put a finger impression.
7.       If you like you can garnish them with chopped pistachios.


Notes:
1.       These pedas were semi-soft with a chewy taste – but not soft like malai peda. If you like these a little hard, you can heat the mixture for another 5 minutes.

2.       It is very important to keep stirring the dough while cooking, else it can get brown.

Thank you for stopping by! Cheers!


If you are on social media, take a minute to follow me there for all sorts of recipe updates.


BMLogo

Wednesday 26 July 2017

Badam Kheer | Almond Kheer | How to Make Badam Kheer | Festive Recipes


This Badam Kheer /Almond Kheer is inspired by the traditional Kheer which is an Indian rice pudding. Instead of rice, I have used coarsely ground almonds in this badam kheer recipe. www.jyotibabel.com
Badam Kheer / Almond Kheer #Recipe
This Badam Kheer /Almond Kheer is inspired by the traditional Kheer which is an Indian rice pudding. Instead of rice, I have used coarsely ground almonds in this badam kheer recipe.

On most festive and special occasions in India, Kheer finds a place in the menu. Be it a birthday or an occasion like Raksha Bandhan. There are many version of Kheer - the one with rice being the most common and popular. You can also check out my Carrot and Almond Kheer recipe here.

Sadly, I do not get to make kheer often at home as DH doesn't like it much. But, whenever I make it for myself, I make 2-3 servings and enjoy a bowl of kheer with every meal. I like my kheer to be creamy with cardamom and saffron, and there should be lots of dried nuts in it.

So, when I chose 'Festival/ Special Day' theme for week 4 of BM#78, I decided to make badam/almond kheer. With Raksha Bandhan around the corner, I think the recipe fitted the bill perfectly. This Badam Kheer is actually quite rich and should be served in small portion size.

Let's check out how I made Badam Kheer/ Almond Kheer from scratch.

This Badam Kheer /Almond Kheer is inspired by the traditional Kheer which is an Indian rice pudding. Instead of rice, I have used coarsely ground almonds in this badam kheer recipe. www.jyotibabel.com


Badam ki Kheer / Almond Kheer Recipe

Serves 4

Ingredients:

1-litre full-fat milk
3 tbsp condensed milk
1 tbsp sugar
¼ cup almonds
2 cardamoms, powdered
10 strands of saffron, soaked in 1 tbsp milk
Almond slivers, chopped pistachios of garnishing

Process:

1. Soak almonds in water for an hour. Drain the water after an hour and soak them in hot water for 5 minutes. Peel off the skin from the almonds and grind them into a rough paste.

2. Boil milk in a deep non-stick pan. Let it simmer on low to medium flame for about 15 minutes, such that the milk reduces to about 3/4th volume.

3. Add the almond paste and boil the milk for another 7-10 minutes. Depending on how thick and creamy you like the kheer, you can boil it for another 10 minutes or so.

4. Add the condensed milk and sugar and stir well. Add cardamom and saffron milk. Stir again and take it off heat.

5. Let it cool down and then you can transfer it to a serving bowl and keep in the fridge to chill.

6. Serve it chilled with almonds and pistachio garnishing.

Notes:

1.       If you do not have condensed milk, you can skip it and add more sugar for sweetness. I had some leftover condensed milk so I used it in the recipe.

2.       This kheer takes best when served chilled.

Thank you for stopping by! Cheers!


If you are on social media, take a minute to follow me there for all sorts of recipe updates.


BMLogo

Wednesday 19 July 2017

No Bake Dates & Nuts Brownies | No Bake Brownie Recipe

No Bake Dates and Nuts Brownies | A healthy, quick and raw brownie made with a handful of ingredients. www.jyotibabel.com
No Bake Dates and Nuts Brownies. #Recipe


No Bake Dates and Nuts Brownies is the answer if you are looking for a healthy and quick snack to munch on.

I had long wanted to try a no-bake brownie. But, being an ardent chocolate lover I had my doubts if such a brownie will be worth the try.

Well, we will never know about it unless we try. So for the 3rd day of the blogging marathon under the 'brownie theme,' I decided to try yet another version of our beloved brownies - No Bake & Raw Dates and Nuts Brownies.

I used this recipe as an inspiration to come up with my version. I didn't use chocolate ganache as I wanted to make it as healthy as possible. 

Let's check the recipe:

No Bake Dates and Nuts Brownies.

Ingredients:

1 cup dates, pitted and halved
1/2 cup almonds
1/4 cup walnuts
2 tbsp cocoa powder
1 tbsp Bournvita powder (optional)

Process:

1. Line a 6 inch tin with parchment paper and set aside.
2. In a blender jar, add the pitted dates and blend it till it looks like a fudgy mess. Take it out into a large bowl.
3. Now finely powder the almonds in the same jar, followed by walnuts. I then added them together again in the blender jar together for a quick mix.
4. Add it to the bowl again, add cocoa powder and bournvita powder (if using). Using a spatula mix it and then tip it into the parchment-lined cake tin.
5. Spread it evenly and press it to get an even surface. Dust some cocoa powder or bournvita powder over the set brownies.
6. Let it sit for 10 minutes and then slice it. They are ready to devour.


No Bake Dates and Nuts Brownies | A healthy, quick and raw brownie made with a handful of ingredients. www.jyotibabel.com

Here are my thoughts on the No Bake Dates & Nuts Brownies

1. For those looking for really healthy brownies, it is a good choice. You can alter the quantities of nuts to suit your taste. Walnuts might give a slightly bitter taste in the end. So, you can use just 2 tbsp of it or skip altogether.

2. I think they tasted best after a day. The first day they tasted like dates and nut bar. But, on the second day, the flavour of cocoa was more pronounced giving it a good chocolatey taste.

3. If you want to make it more decadent, go ahead and cover the brownies with a layer of chocolate ganache. Or you might add some ganache into the dates and nuts mix. In that case, you might have to let the set brownies rest for a while before you slice to get neat slices.

No Bake Dates and Nuts Brownies | A healthy, quick and raw brownie made with a handful of ingredients. www.jyotibabel.com

Want to try some other brownies? I have got you covered. Check these recipes.


Thank you for stopping by! Cheers!

If you are on social media, take a minute to follow me there for all sorts of recipe updates.


BMLogo