Search This Blog

Monday, 22 May 2017

Virgin Orange Mojito Recipe | How to Make Virgin Orange Mojito from Scratch | Non-Alcoholic Party Drink Ideas

Virgin Orange Mojito is a perfect non-alcoholic party drink. With orange juice, a dash of ginger juice and aerated drink, this is simple, fuss-free recipe. Check the recipe at www.jyotibabel.com

Virgin Orange Mojito #Recipe

Virgin Orange Mojito is a perfect non-alcoholic party drink. With orange juice, a dash of ginger juice and aerated drink, this is simple, fuss-free recipe. Just mix certain ingredients, pour and serve. This virgin orange mojito recipe can easily be made for large parties without much issue.

Both I and DH love oranges. When these fruits are in season, having fresh orange juice almost every day is a norm. But, one fine day, after we bid adieu to the Indian Nagpur Oranges, DH spotted some imported variety in the supermarket and bought a bagful home. While they looked inviting, one sip of its juice made me cringe – they turned out to be very-very sour. So, I was left with no option but to make a mocktail out of it.

We all know the classic mojito in its virgin form is made of mint, lemon, little sugar and aerated water. Often sprite and ginger ale are also used. I have seen many flavoured mojito drinks doing rounds on the internet and so, I decided to use those sour oranges in making a virgin orange mojito. I like to add a bit of ginger juice in my mojitos – it adds a depth to the overall flavour.

Oranges are out of season now. But, you can use packaged orange juice if you fancy to try this out.

Virgin Orange Mojito is a perfect non-alcoholic party drink. With orange juice, a dash of ginger juice and aerated drink, this is simple, fuss-free recipe. Check the recipe at www.jyotibabel.com


Virgin Orange Mojito

Ingredients:

¼ cup fresh mint leaves
2 cups orange juice (I used freshly squeezed orange juice)
1 tbsp lemon juice
2 tbsp simple sugar syrup (sugar syrup prepared by mixing and boiling an equal quantity of sugar and water till the sugar is dissolved)
1 tsp fresh ginger juice
Sprite as needed
Ice cubes as needed
Orange slices, lemon slices and fresh mint leaves for garnishing

Process:

In a jar add fresh mint leaves, sugar syrup and muddle it with a spoon. Add lemon juice, followed by orange juice and ginger juice. Stir it nicely.

In two tall glasses, add lots of ice cubes and pour the prepared concoction equally. Top it up with chilled sprite. Garnish with orange slice, lemon slice and a mint sprig. Enjoy!

Don't forget to check out some more party drink ideas here.

Purple Delight
Sweet Lime Soda
Strawberry Lemonade 

Thank you for stopping by! Cheers!

Tuesday, 16 May 2017

Paan Ice Cream Recipe | How to Make Paan Flavoured Ice Cream at Home | Ice Cream Recipes


Paan Ice Cream is an ice-cream flavoured with the Indian meetha paan. This ice-cream has the unique flavour of freshly ground betel leaves and an assortment of flavouring spices.
Paan Ice Cream #Recipe
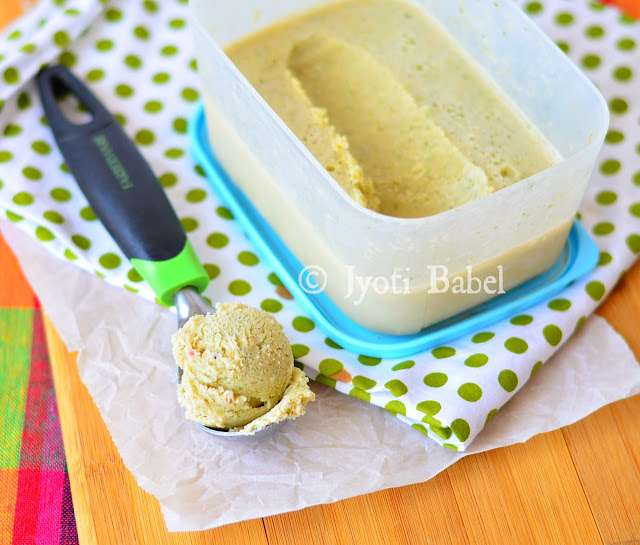
Paan Ice Cream, as the name says is an ice cream flavoured with the Indian meetha paan. This ice cream has the unique flavour of freshly ground betel leaves and an assortment of flavouring spices. If you love Indian Meetha Paan, you are going to love this Paan Ice Cream.

When it comes to cooking, the greatest satisfaction for me comes when I am able to create a flavour in a particular dish exactly the way I wanted. So, when I tasted my paan (betel leaves) flavoured ice cream, I did my little happy dance.

"Meetha Paan" is one of those after-food treats I don't mind indulging in, whenever I get a chance. I remember when I was in my early teens back in my hometown, savouring on a meetha paan was a rare indulgence. But, whenever I had the chance, my special instructions to the 'paanwala bhaiya' were - extra gulkand and no supari (betel nut). The paan vendor had a tiny shop with a number of people flocking in at any point in time. Fresh paan leaves would be kept under a wet red muslin cloth, and there would be an assortment of fillings in various jars kept in a particular order to be folded inside the paan leaf, The vendor would take a fresh paan leaf, slather little 'kattha' and would ask how would you like it filled. A request for extra gulkand would often raise his eyebrow. But, in the end, everyone could have a customized meetha pan to savour on.

A meetha pan is a perfect palate cleanser for me - I always put the whole of it in my mouth and my jaws are in for some extra work. Juice from the betel leaves, gulkand, fennel seeds and the various filling creates an explosion of flavours which any Indian paan loving human will vouch for. Here in Pune, we do get good meetha paan, but most of the times they are already prepared and kept in a cool ice box. When you buy one, the vendors typically dip it in rose syrup and lightly coat in desiccated coconut and serve it to you.

Paan Ice Cream is an ice-cream flavoured with the Indian meetha paan. This ice-cream has the unique flavour of freshly ground betel leaves and an assortment of flavouring spices.
Paan Ice Cream
Sometimes back when I spotted paan ice cream at a very popular ice cream joint in the city, I ordered one. But, it didn't live up to my expectations - it had less flavour of paan and more of mint flavoured mouth freshener. So, I decided to try to make paan ice cream at home. After reading various recipes online, I realized this ice-cream is very much customizable. You can flavour with a blend of things - just like the way you would want to flavour your customized meetha paan.

I stuck with my fresh cream and condensed milk combination for this ice cream. Do read the notes for some extra tips.

Paan Ice Cream Recipe

Ingredients:

250 ml fresh cream
200 g condensed milk
200 ml full-fat milk
10 medium size maghai paan leaves, divided.
1/4 cup gulkand
1 tbsp green cardamom
3 tbsp fennel seeds
1 tbsp mithi supari (optional, I used it to impart a note of mint flavour in the ice cream. Mithi supari is a mint flavoured sweetened betel nut-based mouth freshener easily available in India)

Process:

1. In a small blender jar, add 5 paan leaves, gulkand, green cardamom, fennel seeds and mithi supari. Blend it to a paste using as little water as possible. Using a strainer, strain it to get the extract.
2. In a large blender jar, add the extract, rest of the 5 paan and cream. Blend until smooth. The paan leaves should be finely blended.
3. Add the milk and condensed milk to the mixture in the blender and blend again till smooth.
4. Pour into a freezer safe container and freeze for 2 hours.
5. Take out the half set ice cream and tip it into the blender jar and blend it until smooth. Freeze it again till frozen. It will take anywhere between 4 to 6 hours.
6. Take it out 5 minutes before serving. Serve scoops of it chilled. You can relish it with or without a topping.

Paan Ice Cream is an ice-cream flavoured with the Indian meetha paan. This ice-cream has the unique flavour of freshly ground betel leaves and an assortment of flavouring spices. www.jyotibabel.com


Notes:

1. I like my paan ice cream to be smooth. So, I strained the mixture of paan leaves, gulkand, green cardamom, fennel seeds and mithi supari to get an extract. If you like coarse bits of it in your ice cream, you may skip the step of straining.
2. For topping, you can use, rose syrup, tutti fruity or even tiny bit of gulkand.
3. Churning it before the final freezing if ice cream helps to reduce ice crystals in the ice cream. So, don't skip the step. You may churn it 2-3 times if you like.
4. Another way of making this ice cream is - get 3-4 meetha pan from the vendor and churn it with milk, cream and condensed milk in the quantity mentioned in the recipe.

You can also check out my recipes for

Chikkoo Ice cream
Cardamom Kulfi
Thandai Kulfi

Thank you for stopping by! Cheers!

Saturday, 13 May 2017

Mango Mastani Recipe | How to Make Mango Mastani at Home | Mango Recipes | Summer Coolers


Mango Mastani #Recipe
Mango Mastani is a very thick mango flavoured milkshake topped with a scoop of ice-cream, nuts, and chopped fresh fruit. Often tutti fruity or glace cherries are also used as toppings. You can get as creative as you like with the toppings. Mastani comes in many flavours – mixed fruits, pineapple, chikoo, etc. But, since mangoes are in season now I am going to share my how I make Mango Mastani at home.
I am a very big fan of mangoes. Despite that, I have hardly shared any mango based recipes in this space. Well, there is a reason.

Mangoes are something I really look forward to during the summer months in India. Every year, I think of ‘n’ number of mango recipes to try, but every year I end up enjoying the mango fruit as it is. Mangoes are so delicious in itself that I don’t really have the patience to make something out of it. 

This year, I finally decided to share some mango recipes here and I am making a start today with  my mango mastani recipe


I grew up in Assam gorging on the best Langda Mangoes. But, this variety of mangoes is not common in Pune. Here it is all about Alphonso or Haphus Mangoes – they are quite flavourful, luscious and sweet. But, still, my heart longs for the Langda Aam. We do them get here for a short while, and I do not miss the opportunity to get a bagful home – I guess they are transported here all the way from Bengal.

The mango mastani recipe I am sharing here is a Pune special drink. Soon after we had shifted to Pune some years back, I came across this drink named Mango Mastani and I thought – what a name! While there are no established facts about it but, it is said to be named after Peshwa Bajirao’s wife Mastani. I guess most of us who are into Bollywood movies know about her from the movie ‘Bajirao Mastani’.

Let's check out the recipe for mango mastani now.
Mango Mastani Recipe

Ingredients:

Serves 1

1 ripe Alphonso mango, peeled, stoned and chopped into pieces
1 tbsp sugar (adjust to taste)
200 ml chilled milk
1 scoop vanilla ice-cream (you can use mango ice-cream also)
Chopped nuts, fresh mango pieces and tutti fruity pieces for topping

Process:

1. In a blender jar, add the mango pieces, sugar and milk and blend it until smooth. Adjust sweetness to taste if needed.

2. In a tall glass, add the prepared thick mango shake. Top it with a scoop of vanilla ice-cream, chopped nuts, fresh mango pieces and tutti fruity. Serve it immediately. Enjoy!


Notes:

1. You can also add 1 or 2 tbsp condensed milk to the shake. You may have to adjust the sugar quantity as needed.

Other shake and smoothie recipes that you can check here

Blueberry Lassi
Makhanya Lassi
Dates Mocha Shake

Thank you for stopping by! Cheers!
Wednesday, 10 May 2017

Veg Biryani Recipe | How to Make Veg Biryani at Home from Scratch


Veg Biryani is a flavourful, spicy and aromatic rice dish that is much loved in India. Here is an easy to follow veg biryani recipe that you can try
Veg Biryani | How to Make Veg Biryani #Recipe
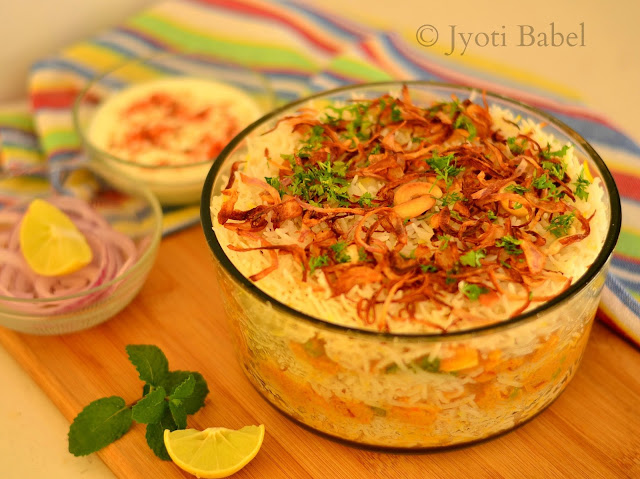
Biryani is a flavourful, spicy and aromatic rice dish that is much loved in India. This is one dish that is said to have found its roots in India during the Mughal rule. There are many versions of Biryani in India like Awadhi Biryani, Hyderabadi Biryani, etc.. While non-vegetarian Biryanis are more famous, vegetarians like me can indulge in veg biryani like the one I am sharing today.

Making Biryani at home from scratch was a dream for me. Reading all the recipes online made it look so daunting and time-consuming that, for a long long time I didn't even give making it from scratch a thought. And, it is a fact that making a pot of biryani at home is a time-consuming process. But, once you have made the perfect biryani on your own, the feeling you will experience will be no less than that of conquering a battle. Period.

When I make it at home, I just wholeheartedly make this. There are 2 reasons - one is that it will take about 1½ to 2 hours to make biryani from scratch. Gathering all the ingredients, cooking rice, preparing gravy, preparing fresh herbs for layers and onion crisps for topping - there is quite a lot to do. I don't have more than that much time to prepare a onetime meal. Secondly, I do not want to diminish my appetite by having some snacks before having biryani. Trust me on this - a biryani tastes best when you are really hungry!

A heap of homemade biryani, raita and some onion slices - that's enough for a hearty and filling meal.

My best tips if you want to try this recipe will be:

  • Read the recipe several times before starting out. 
  • Get all the steps clear in your mind. 
  • Check if you have all the ingredients handy in your pantry. 
  • Lastly, make it when you have at least 3 leisure hours at hand. You can't make a good biryani in a hurry!
Making good biryani has its own learning curve. You have to make it a couple of times to get the hang of getting it perfect every time. The first time I made it, I largely followed this recipe. In my next several attempts, I made my own additions and changes to bring you this recipe today. Do check the notes for some extra tips.

I must add here this was the first thing I shot to share on the blog after the long blogging break I took after having my baby. It was already evening by the time this biryani was ready and baby M was taking a nap. On an impulse, I set the dish and took out my camera and clicked away!

Without much ado, let's hop over to the recipe of veg biriyani now.

Veg Biryani is a flavourful, spicy and aromatic rice dish that is much loved in India. Here is an easy to follow veg biryani recipe that you can try. www.jyotibabel.com


Inspired from here

Veg Biryani Recipe | How to Make Veg Biryani at Home from Scratch

For the rice:

Ingredients


2 cups Basmati rice (I used Fortune Biryani rice – these are extra-long grains of basmati, specially meant for biryani)
2 tbsp ghee
2 clove
1” cinnamon stick
2 green cardamoms
Small piece of mace
1 black cardamom
10 saffron strands soaked in 1 tsp milk and rubbed in a pestle mortar.

Process:

1. Thoroughly wash and drain the rice. Soak it in fresh water for about half an hour.

2. Boil about 8 cups of water in a large vessel to cook the rice. When the water comes to a boil, add all the whole spices. Drain water from the soaked rice and add the rice to the boiling water. Cook the rice uncovered till they are half cooked.

3. When about half cooked, drain the rice in a colander and pour cold water over it to stop the process of cooking. When all the water is drained, pour the ghee over the rice.

4. Take about ½ cup of cooked rice and add rubbed saffron to it. Keep it separately until needed.

For the vegetable layering:

Ingredients

Veggies:
½ cup fresh beans, chopped
½ cup green peas
½ cup cauliflower florets
1 cup carrot, peeled and chopped
½ cup paneer cubes

Handful of cashew nut halves

Gravy:
2 tablespoon broken cashew nuts
1 tablespoon khus khus (white poppy seeds)
1/4 cup vegetable oil
1 large onion, boiled and made into a paste
1 bay leaf
1 piece of cinnamon
4 cloves
2 cardamom pods
2 teaspoon ginger paste
2 green chilli chopped
1 teaspoon garlic paste
3 medium tomatoes, blanched and pureed

¼ tsp asafetida
½ tsp turmeric
2 teaspoons chilli powder

½ teaspoon cumin powder
½ cup full-fat yoghurt
1 teaspoon biryani masala (I use Eastern Biryani Masala)
Salt to taste

Process:

1. In a pressure cooker, add the chopped veggies. Add about 1 cup water and cooked it for 1 whistle. Switch off the gas immediately and put the cooker under running tap water to cool it down. Open and drain the veggies. Reserve the water in which the veggies were cooked. Alternately, you can half cook the veggies in a pan of boiling water.

2. Soak the cashew, khus khus for half an hour in warm water. Grind it into a smooth paste using little water. Keep aside.

3. In a large pan or Khadai heat oil. Add the bay leaf, asafetida, cloves, cardamom, cinnamon and sauté for 30 seconds. Add the chopped chillies, ginger and garlic paste. Add cashew nut half and fry them till light brown and toasted. Stir and add the onion paste. Fry the paste for 5-7 minutes, till it starts looking brown.

4. When onion paste looks cooked add cashew and khus paste. Stir and cook for 2 minutes and add pureed tomatoes. Stir well and cook for 5-7 minutes.

5. Take the pan away from heat and add the beaten yoghurt and still constantly to prevent the gravy from curdling. Take the pan back on heat and add rest of the spices. Stir and now add the half cooked veggies and paneer pieces. Add the reserved vegetable stock, stir and cover the pan. Cook on low heat for about 10 minutes. When done, oil will separate from the sides of the gravy. Set aside.


Veg Biryani is a flavourful, spicy and aromatic rice dish that is much loved in India. Here is an easy to follow veg biryani recipe that you can try.


Layering and Topping:

For layering
½ cup chopped cilantro leaves
¼ cup mint leaves (see notes)
2 tablespoons ghee

Toppings:

Ingredients
1 large onion
Oil for deep frying

Process:

1. Peel the onion and cut into 2 halves. Slice them very thin.

2. Heat oil in a Kadhai for frying the onions. Fry them in batches till they are dark brown and crisp; do not overcrowd the Kadhai. Drain the fried onion on paper towel. You can make these fried onions in advance.

When all these things are ready, you are ready to layer the biryani. (See Notes) Take a large baking dish and depending on its depth, you can go for 2 or more layers. Grease the dish and add 1/4th of the rice followed by chopped coriander and mint. Add ½ of the gravy followed by rice, coriander, mint again. Add rice followed by rest of the gravy. Top it with remaining rice. Sprinkle the reserved saffron rice on top and drizzle ghee over the rice.

Cover the baking dish with an aluminium foil and bake in an oven preheated at 180 C for 15 to 20 minutes. Turn the oven off, and let the biryani sit in the hot oven another 10 minutes.

When serving the biryani, top with the fried onions. Serve it hot with raita or yoghurt.

Notes:

1. It just takes a few minutes for half cooked rice to get fully cooked, so keep an eye. Overcooked rice will give a mushy and stick biryani. The rice should have a slight crunch.

2. Adding whole spices while cooking rice makes them more fragrant.

3. I cook the veggies in a pressure cooker to make the process faster. However, if you are sceptic about putting a hot cooker under cold tap water, cook the veggies in a pan of boiling water till they are half cooked.

4. I like to have 2-3 layers in my biryani. However, if you like you can place 1/2 of the rice, then the entire gravy and top it again with rice.

5. It is best to keep everything ready and layer the biryani about an hour before serving. The chopped fresh mint in the layering tends to go bitter if left for longer. If you need to layer in advance, I suggest skipping the mint entirely in layers. You can, however, use mint as garnish right before serving.

You can also check out this Sweet Pineapple Raita recipe that goes very well with Veg Biryani.

Thank you for stopping by. Cheers!

Thursday, 4 May 2017

The Sixth - The Legend of Karna by Karan Vir - Karna Trilogy Part 1


The Sixth - The Legend of Karna by Karan Vir - Karna Trilogy Part 1

When I got the opportunity to choose a book from a list of titles by leadstartcorp to review, I was instantly interested in this title The Sixth - The Legend of Karna by Karan Vir. Readers who have followed by blog will know that I have a special liking for books based on Indian mythology. This book is not entirely mythological, but a blend of two stories from two eras, running parallel and culminating into something interesting for the readers. This is the debut book of the author and is supposedly Book 1 of his Karna Trilogy.

Karan vir Oberoi is the main protagonist of the novel. He is a real estate tycoon living in New York. But, something has not been right in his life of late. He is experiencing recurring dreams of an ancient warrior clad in golden armor and golden earrings. There is a sense of déjà vu, and he feels as if the warrior wants to tell him something. Even though he tries hard to make some sense of his dreams - he ends up being entirely baffled by it. His business associates also see a difference in his attitude and swings in his mood at work. When Karan's mother comes to know about these dreams, she advises him to go back to his roots- India, to get the answers he is seeking. Amidst all these, there is someone who is plotting against Karan and hatching plans to assassinate him. Karan however, miraculously survives the attempt and heads to India where his destiny awaits him.

Running parallel to Karan's life is Karna's story. He is the one he dreams about. We all know about Suryaputra Karna, the unsung hero of Mahabharata. He was Kunti's first born and was eventually treated as the 'Sixth' Pandava at the end of his eventful life. Hence, the author has aptly named the first book of his Karna Trilogy as 'The Sixth'. Karna was known to be benevolent king; he defied social customs and traditions to achieve immortal glory by his virtues and skills. He became the king of Anga and the most trusted man of Duryodhana, the crown prince of Hastinapur. We all know how his association with Duryodhana ultimately sealed his fate.

All of you who have grown up watching the legendary serial Mahabharata on Doodarshan will probably agree that when you think of Karna from Mahabharata, the face of actor Pankaj Dheer will come floating in your mind. Since, then many other versions of the epic have been aired on various channels, but I never had the chance of watching any of those (and I am glad about it). So, the face of Karna in my mind stays the one I saw in my childhood days. But, after reading this novel, a new face of Karna has surfaced in my mind. Thanks to the liberal use of sketches and graphics throughout the novel.

Even though I am not very good at spotting typos, a couple of them did come to my attention. That is something that can be done away with by the editing team.

The premise of the book sounds promising. While most of us already know about Karna, it is interesting how the author tries to amalgamate Karna's story into Karan's life. However, as a reader I did feel the flow of the story could be better. There were parts that could be elaborated, for example - the part where Karan braves a terrorist attack while on a business trip and saves his business partner. His journey in India also seemed to be rushed upon. Also, I really couldn't gauge the character of 'KPS' as he made fleeting entries here and there in the story in the style of a Bollywood villain. May be the author has intended it that way. But, somehow it didn't work for me. Since the story will span three volumes; there are too many unanswered questions when the first part of the trilogy ends. That does rouse the curiosity of the readers and all that can be done is, wait for the next book of the series to be released.

I am looking forward to the next book of the series as I am curious to know what happens next in Karan's life.

I received this book for Leadstart publishers in exchange for an honest review.

Thank you for stopping by! Cheers!